Centos7通过reposync同步国内yum源-搭建局域网内网本地Yum源
在生产环境中无法连接外网的情况,在安装某些软件时通常又需要先安装大量的基础依赖包,通常的做法是使用系统镜像配置一个本地yum源,使用yum安装依赖,但是镜像通常较大,如果只是为了安装一个两个的包配置一个镜像yum源费时费力,我们可以事先在自己的可以连接外网测试环境主机使用reposync的方式同步国内的yum源下载缓存rpm包到本地机,使用createrepo命令制作一个本地内网yum仓库。
测试主机操作系统:centos7.4 x64,2c4G,100G系统盘,1T数据盘。分区lvm格式,数据盘单独一个lv,挂载在 /data目录。
reposync命令是一个python脚本。包含在yum-utils包中。因此,我们如果要使用reposync命令的时候,需要安装yum-utils包。
使用以下命令:yum install yum-utils
reposync -r 仓库名(一般为base) -p 目标目录
没有的小伙伴门自行安装yum-utils
1.安装apache和repository的管理工具yum-utils
yum install httpd yum-utils createrepo -y
systemctl enable httpd
systemctl start httpd
2.创建文件保存目录
mkdir -p /data/website/centos/6/
mkdir -p /data/website/centos/7/
mkdir -p /data/website/epel/
3.修改/etc/yum.repos.d/CentOS-Base.repo
## centos7

[base7]

name=CentOS-7-os-cmiot.local

baseurl=http://mirrors.163.com/centos/7/os/x86_64/

gpgcheck=1

gpgkey=http://mirror.centos.org/centos/RPM-GPG-KEY-CentOS-7

#released updates

[updates7]

name=CentOS-7-updates-cmiot.local

baseurl=http://mirrors.163.com/centos/7/updates/x86_64/

gpgcheck=1

gpgkey=http://mirror.centos.org/centos/RPM-GPG-KEY-CentOS-7

#additional packages that may be useful

[extras7]

name=CentOS-7-extras-cmiot.local

baseurl=http://mirrors.163.com/centos/7/extras/x86_64/

gpgcheck=1

gpgkey=http://mirror.centos.org/centos/RPM-GPG-KEY-CentOS-7

## centos6

[base6]

name=CentOS-6-os-cmiot.local

baseurl=http://mirrors.163.com/centos/6/os/x86_64/

gpgcheck=1

gpgkey=http://mirror.centos.org/centos/RPM-GPG-KEY-CentOS-6

#released updates

[updates6]

name=CentOS-6-updates-cmiot.local

baseurl=http://mirrors.163.com/centos/6/updates/x86_64/

gpgcheck=1

gpgkey=http://mirror.centos.org/centos/RPM-GPG-KEY-CentOS-6

#additional packages that may be useful

[extras6]

name=CentOS-6-extras-cmiot.local

baseurl=http://mirrors.163.com/centos/6/extras/x86_64/

gpgcheck=1

gpgkey=http://mirror.centos.org/centos/RPM-GPG-KEY-CentOS-6

## epel

[epel6]

name=CentOS-6-epel-cmiot.local

baseurl=https://mirrors.aliyun.com/epel/6/x86_64/

gpgcheck=0

[epel7]

name=CentOS-7-epel-cmiot.local

baseurl=https://mirrors.aliyun.com/epel/7/x86_64/

gpgcheck=0
4.使用yum repolist验证CentOS-Base.repo文件是否生效
# yum repolist
Loaded plugins: fastestmirror
Loading mirror speeds from cached hostfile
repo id                              repo name
base6                                CentOS-6-os-cmiot.local
base7                                CentOS-7-os-cmiot.local
epel6                                CentOS-6-epel-cmiot.local
epel7                                CentOS-7-epel-cmiot.local
extras6                              CentOS-6-extras-cmiot.local
extras7                              CentOS-7-extras-cmiot.local
updates6                             CentOS-6-updates-cmiot.local
updates7                             CentOS-7-updates-cmiot.local
5.同步CentOS-Base.repo文件中163的centos6包文件
reposync -n --repoid=extras6 --repoid=updates6 --repoid=base6 -p /data/website/centos/6
reposync -n --repoid=epel6 -p /data/website/epel/
6.同步CentOS-Base.repo文件中163的centos7包文件
reposync -n --repoid=extras7 --repoid=updates7 --repoid=base7 -p /data/website/centos/7
reposync -n --repoid=epel7 -p /data/website/epel/
createrepo 命令用于创建yum源(软件仓库),即为存放于本地特定位置的众多rpm包建立索引,描述各包所需依赖信息,并形成元数据。
参数选项说明:
-u  --baseurl <url>
    指定Base URL的地址

-o --outputdir <url>
    指定元数据的输出位置

-x --excludes <packages>
    指定在形成元数据时需要排除的包

-i --pkglist <filename>
    指定一个文件,该文件内的包信息将被包含在即将生成的元数据中,格式为每个包信息独占一行,不含通配符、正则,以及范围表达式。

-n --includepkg
    通过命令行指定要纳入本地库中的包信息,需要提供URL或本地路径。

-q --quiet
    安静模式执行操作,不输出任何信息。

-g --groupfile <groupfile>
    指定本地软件仓库的组划分,范例如下:
createrepo -g comps.xml /path/to/rpms
    注意:组文件需要和rpm包放置于同一路径下。

-v --verbose
    输出详细信息。

-c --cachedir <path>
    指定一个目录,用作存放软件仓库中软件包的校验和信息。
    当createrepo在未发生明显改变的相同仓库文件上持续多次运行时,指定cachedir会明显提高其性能。

--update
    如果元数据已经存在,且软件仓库中只有部分软件发生了改变或增减,
    则可用update参数直接对原有元数据进行升级,效率比重新分析rpm包依赖并生成新的元数据要高很多。

-p --pretty
    以整洁的格式输出xml文件。

-d --database
    该选项指定使用SQLite来存储生成的元数据,默认项。
7.创建索引
格式:createrepo -po 源目录 索引元数据的输出位置目录
createrepo -po /data/website/centos/6/base6/ /data/website/centos/6/base6/
createrepo -po /data/website/centos/6/updates6/ /data/website/centos/6/updates6/
createrepo -po /data/website/centos/6/extras6/ /data/website/centos/6/extras6/
createrepo -po /data/website/epel/epel6/ /data/website/epel/epel6/
createrepo -po /data/website/centos/7/base7/ /data/website/centos/7/base7/
createrepo -po /data/website/centos/7/updates7 /data/website/centos/7/updates7
createrepo -po /data/website/centos/7/extras7 /data/website/centos/7/extras7
createrepo -po /data/website/epel/epel7 /data/website/epel/epel7
8.创建组文件的索引
说明:yum groupinstall的时候会用到这个索引。
wget http://mirrors.163.com/centos/6/base6/repodata/43d8fd068164b0f042845474d6a22262798b9f0d1f49ad1bf9f95b953089777d-c6-x86_64-comps.xml -P /tmp
wget http://mirrors.163.com/centos/7/base7/repodata/38b60f66d52704cffb8696750b2b6552438c1ace283bc2cf22408b0ba0e4cbfa-c7-x86_64-comps.xml -P /tmp
createrepo -g /tmp/43d*-comps.xml /data/website/centos/6/base6/
createrepo -g /tmp/38b*-comps.xml /data/website/centos/7/base7/
9.下载KEY文件
用户下载安装这个RPM包时,引入RH官方的这个RPM GPG公钥,用来验证RPM包是不是RH官方签名的
wget http://mirrors.163.com/centos/7/os/x86_64/RPM-GPG-KEY-CentOS-7 -P /data/website/centos/
wget http://mirrors.163.com/centos/6/os/x86_64/RPM-GPG-KEY-CentOS-6 -P /data/website/centos/
10.设置apache 根目录设置为/data/website
修改/etc/httpd/conf/httpd.conf
注释#DocumentRoot "/var/www/html"这一行,在其下添加
#DocumentRoot "/var/www/html"
DocumentRoot "/data/website"
<Directory "/data/website">
  Options Indexes FollowSymLinks
  Options Indexes
  AllowOverride All
  Order allow,deny
  IndexOptions Charset=UTF-8
  Allow from all
  Require all granted
</Directory>
11.删除welcome配置,达到访问服务器地址直接现实站点根目录
mv /etc/httpd/conf.d/welcome.conf /etc/httpd/conf.d/welcome.conf.bak
12.开启httpd服务
systemctl restart httpd
systemctl enable httpd
浏览器就可以通过访问IP来访问/data/website目录

13.定时reposync同步任务
用户端/etc/yum.repos.d/CentOS-Base.repo文件修改
下面以centos6为例:
[base]
name=CentOS-$releasever - Base - cmiot.local
baseurl=http://172.20.11.249/centos/$releasever/base6
gpgcheck=1
gpgkey=http://172.20.11.249/centos/RPM-GPG-KEY-CentOS-6
#released updates
[updates]
name=CentOS-$releasever - Updates - cmiot.local
baseurl=http://172.20.11.249/centos/$releasever/updates6
gpgcheck=1
gpgkey=http://172.20.11.249/centos/RPM-GPG-KEY-CentOS-6
#additional packages that may be useful
[extras]
name=CentOS-$releasever - Extras - cmiot.local
baseurl=http://172.20.11.249/centos/$releasever/extras6
gpgcheck=1
gpgkey=http://172.20.11.249/centos/RPM-GPG-KEY-CentOS-6
[epel]
name=CentOS-$releasever - Extras - cmiot.local
baseurl=http://172.20.11.249/epel/epel6
gpgcheck=0
设置每天定时更新脚本 update.sh
#!/bin/bash
echo 开始同步ubuntu
apt-mirror
echo ubuntu同步结束

echo 开始同步centos6
reposync -n --repoid=extras6 --repoid=updates6 --repoid=base6 -p /data/website/centos/6
reposync -n  --repoid=epel6 -p /data/website/epel/
echo centos6同步结束

echo 开始同步centos7
reposync -n --repoid=extras7 --repoid=updates7 --repoid=base7 -p /data/website/centos/7
reposync -n  --repoid=epel7 -p /data/website/epel/
echo centos7同步结束

#更新元数据
createrepo --update /data/website/centos/6/base6/
createrepo --update /data/website/centos/6/updates6/
createrepo --update /data/website/centos/6/extras6/
createrepo --update /data/website/epel/epel6/
createrepo --update /data/website/centos/7/base7/
createrepo --update /data/website/centos/7/updates7/
createrepo --update /data/website/centos/7/extras7/
createrepo --update /data/website/epel/epel7/
14. crontab -e 添加定时任务
0 6 * * * /data/update.sh
crontab -l 查看定时任务
0 6 * * * /data/update.sh
安装完以后以下是Nginx的默认路径:
  (1) Nginx配置路径:/etc/nginx/

  (2) PID目录:/var/run/nginx.pid

  (3) 错误日志:/var/log/nginx/error.log

  (4) 访问日志:/var/log/nginx/access.log

  (5) 默认站点目录:/usr/share/nginx/html
事实上,只需知道Nginx配置路径,其他路径均可在/etc/nginx/nginx.conf 以及/etc/nginx/conf.d/default.conf 中查询到。

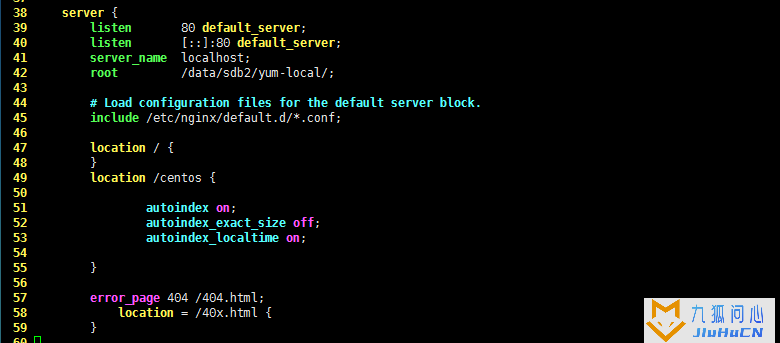
38 server {
39 listen 80 default_server;
40 listen [::]:80 default_server;
41 server_name localhost;
42 root /data/sdb2/yum-local/;
43
44 # Load configuration files for the default server block.
45 include /etc/nginx/default.d/*.conf;
46
47 location / {
48 }
49 location /centos {
50
51 autoindex on;
52 autoindex_exact_size off;
53 autoindex_localtime on;
54
55 }
56
57 error_page 404 /404.html;
58 location = /40x.html {
59 }
15.3 启动Nginx并设置开机自动运行
(开启服务后需要稍等片刻才能加入开机自启动)

systemctl start nginx.service
systemctl stop nginx.servicesystemctl enable nginx.service systemctl disable nginx.service
15.4 打开防火墙相应端口或关闭防火墙
systemctl stop firewalld.service systemctl disable firewalld.service
15.5 关闭selinux
vim /etc/selinux/config 将 SELINUX=disabled
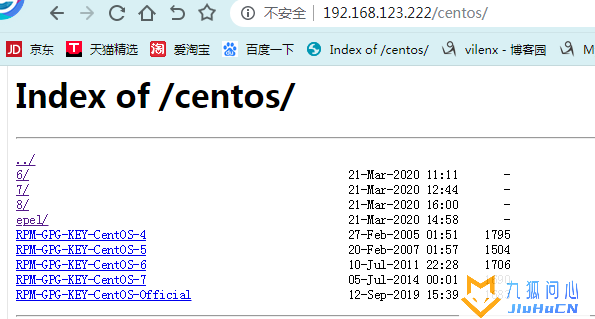
15.6 打开网站测试如下图

15.7 打开网页403 forbidden 错误处理方法
一、由于启动用户和nginx工作用户不一致所致
1.1查看nginx的启动用户,发现是nobody,而为是用root启动的
命令:ps aux | grep "nginx: worker process" | awk'{print $1}'
1.2将nginx.config的user改为和启动用户一致,
命令:vi conf/nginx.conf 修改页面顶部 user nginx; 为 user root;
二、缺少index.html或者index.php文件,就是配置文件中index index.html index.htm这行中的指定的文件。
  1.    server {
  2.      listen       80;
  3.      server_name  localhost;
  4.      index  index.php index.html;
  5.      root  /data/sdb2/yum-local;
  6.    }
如果在/data/www/下面没有index.php,index.html的时候,直接文件,会报403 forbidden。
三、权限问题,如果nginx没有web目录的操作权限,也会出现403错误。
解决办法:修改web目录的读写权限,或者是把nginx的启动用户改成目录的所属用户,重启Nginx即可解决
  1.    chmod -R 777 /data
  2.    chmod -R 777 /data/sdb2/yum-local
四、SELinux设置为开启状态(enabled)的原因。
4.1、查看当前selinux的状态。
1. /usr/sbin/sestatus
4.2、将SELINUX=enforcing 修改为 SELINUX=disabled 状态。
  1.    vi /etc/selinux/config
  2.
  3.    #SELINUX=enforcing
  4.    SELINUX=disabled
4.3、重启生效。reboot。
版权声明:本文采用知识共享 署名4.0国际许可协议BY-NC-SA 进行授权
文章作者:jiuhucn
文章链接:https://www.jiuhucn.com/2023/02/22/3143.html
免责声明:本站为资源分享站,所有资源信息均来自网络,您必须在下载后的24个小时之内从您的电脑中彻底删除上述内容;版权争议与本站无关,所有资源仅供学习参考研究目的,如果您访问和下载此文件,表示您同意只将此文件用于参考、学习而非其他用途,否则一切后果请您自行承担,如果您喜欢该程序,请支持正版软件,购买注册,得到更好的正版服务。
本站为非盈利性站点,并不贩卖软件,不存在任何商业目的及用途,网站会员捐赠是您喜欢本站而产生的赞助支持行为,仅为维持服务器的开支与维护,全凭自愿无任何强求。


共有 0 条评论